
RentPackage Main Screen Guide: Landlords and Property Managers Learn the 7 Areas in Five Minutes, Where to Collect Rent, Renew Leases and Fill Vacancies
Contents
Why learn the main screen first
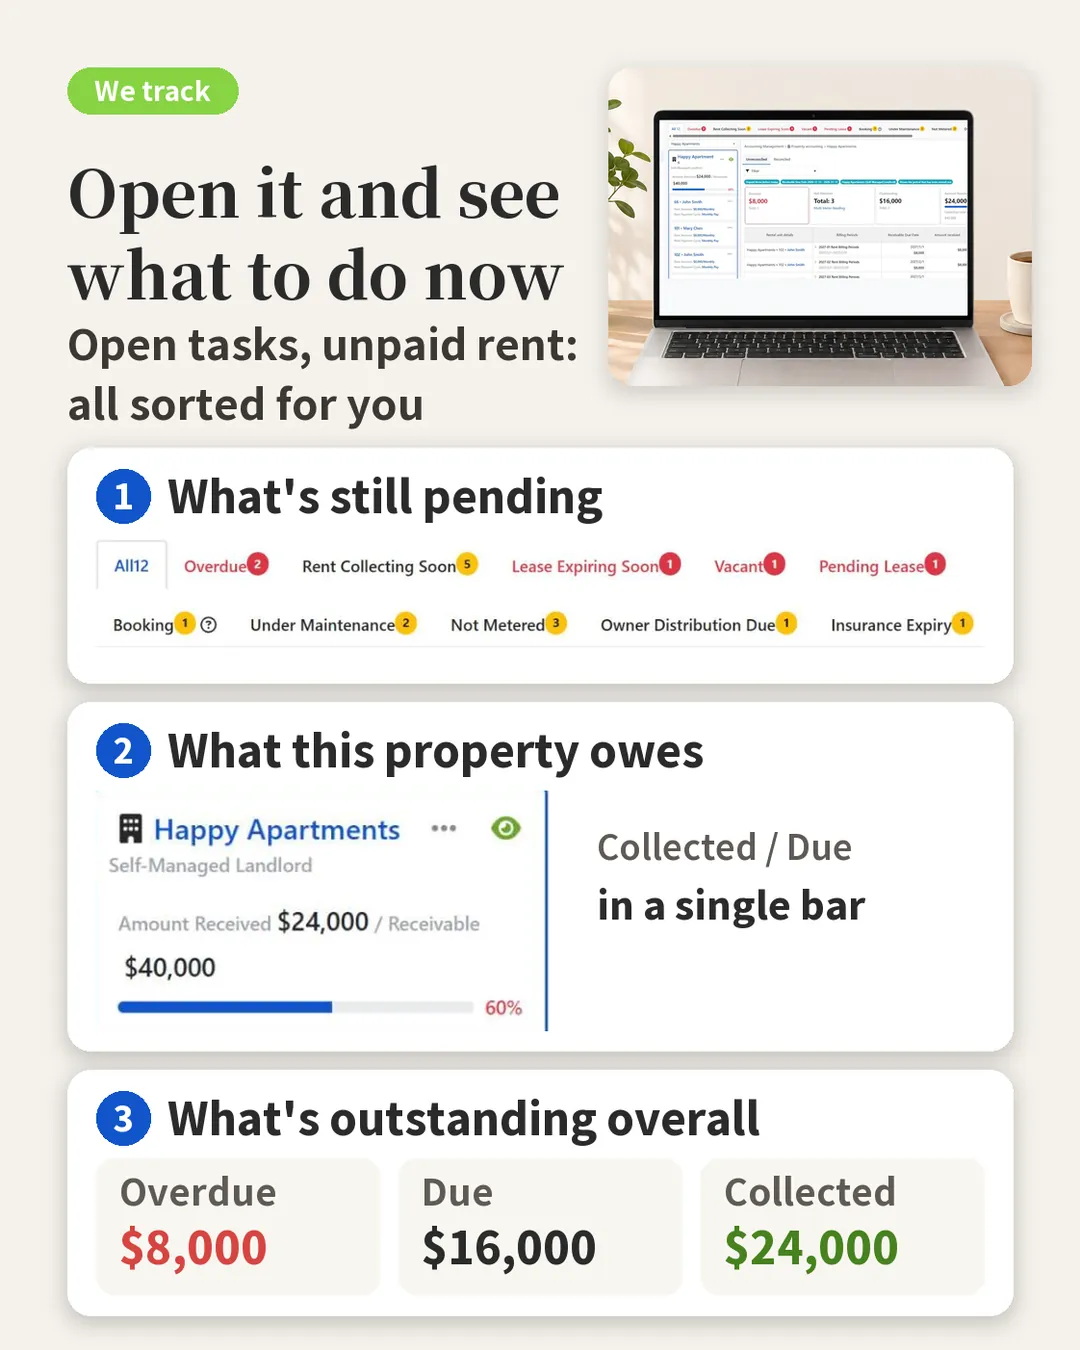
When you first start using rental management software, the most common sticking point is this: there are many features, but you don't know where to click first each day. To chase rent you dig through your ledger to find who hasn't paid, you rely on memory to know which leases are about to expire, and you count vacant units one by one.
- See which units need attention today as soon as you log in
The status bar at the top counts units by status in real time, such as Overdue, Rent Collecting Soon, Lease Expiring Soon, Vacant, Not Metered and Insurance Expiry. Click a tab and the left panel lists only those units, so you no longer have to search your ledger or Excel. - Understand each unit's status without opening it
Each unit card shows the rent and billing cycle, plus status tags such as overdue days and Not Metered. The property card shows received / receivable amounts; click it to open Property accounting. - Find the unit, then handle it on the same page
Click a unit and the central workspace loads its Tenant Billing Periods. Mark as Received, Add bill and Deposits & Prepayment are all handled here, without jumping between menus. - Multiple companies and roles, one account
If you run several branches, switch between them from the account block at the top left; each company's properties and accounting are kept separate. If you are also a tenant or an owner yourself, switch from the Tenant Portal or Owner Portal at the bottom of the left menu.
Seven areas of the main screen
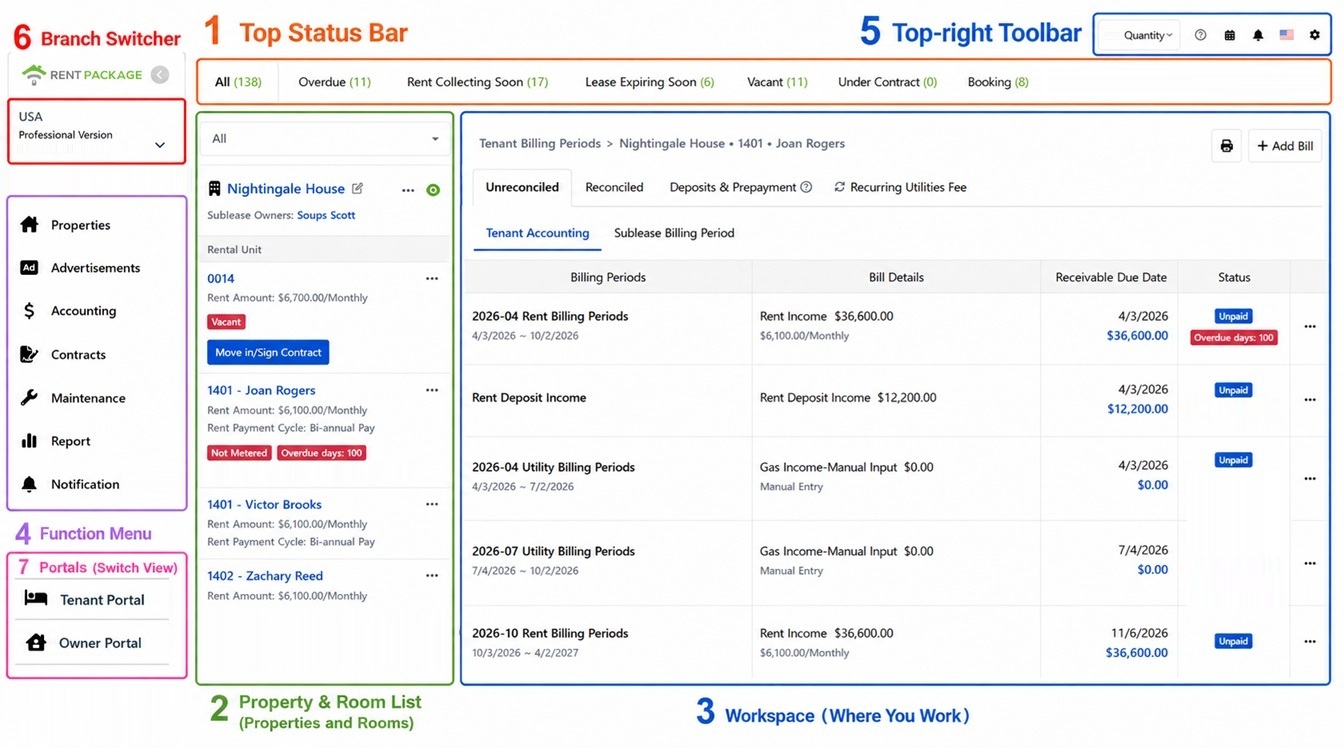
The main screen you see after logging in is made up of seven areas, numbered in the image below: 1 the status bar at the top, 2 the property and unit list in the left panel, 3 the workspace in the center, 4 the function menu on the left, 5 the toolbar at the top right, 6 account and branch switching at the top left, and 7 the Tenant Portal and Owner Portal at the bottom of the left menu. Remember one rule and you won't get lost: the status bar tells you what to do today, the left panel helps you find which unit, and the workspace is where you actually do the work.
1. Status Bar: Today's Tasks at a Glance
The row of tabs at the very top is the to-do dashboard for the whole system: All, Overdue, Rent Collecting Soon, Lease Expiring Soon, Vacant, Pending Lease, Booking, Under Maintenance, Not Metered and Insurance Expiry. The number on each tab is a real-time count. These tabs are also filters: click a tab and the property list in the left panel shows only the units in that status; clicking Under Maintenance opens the list of maintenance requests instead.
Start each day by checking these numbers: overdue items to collect, leases expiring requiring renewal talks, vacant rooms to list. The system calculates it for you.
2. Left Panel: Property & Room List Overview
The left panel has two levels: property cards on the outside (showing the property name and owner), with each rental unit listed below. Each unit shows the rent, billing cycle, next rent date and status tags (Vacant, Pending Lease, overdue days, Not Metered), so you can read it without opening it. Vacant units also show an Add Lease button, so you can start arranging a move-in right away. The property card shows the received / receivable amounts and the collection rate; click it to open Property accounting.
Click a room to load its details in the workspace on the right, the most used path. The top dropdown enables further filtering.
3. Central Workspace: Main Area for Operations
The largest area in the center is the workspace, and its content changes with what you select: clicking a unit loads its Tenant Billing Periods (with tabs such as Unreconciled, Reconciled, Deposits & Prepayment and Recurring Utilities Fee; once payment arrives, Mark as Received is done here), opening Maintenance shows maintenance requests, and opening Report shows reports. Each feature has its own detailed guide; here you only need to remember one thing: find the item in the left panel, do the work in the workspace.
4. Left Sidebar: Module Access Points
The left column is the entry point to each module, from top to bottom: Properties (the home of daily management), Advertisements (rental listings), Accounting, Contracts (Tenant Lease, Owner Agreement and Contract template), Maintenance (Maintenance Management and Calendar), Report (Financial Report, Tax Report and Manual Journal Entry) and Notification (Custom Notification Rule and Notification Log). Click a module and the workspace switches to that feature. For the Tenant Portal and Owner Portal at the bottom of the menu, see point 7.
5. Top Right Toolbar: Settings & Extras
At the top right, from left to right: Quantity (see how many you have purchased and used), the question mark (opens FAQ articles), the play button (opens tutorial videos), the notification bell (system event reminders), language switching, and the gear at the far right (Settings). The gear is the entry to all settings: Member Information, Organization Information (upload your company logo and seal here), Notification Settings, Employee Management, Billing Center and Purchase.
6. Account & Branch Switching: Seamlessly switch between multiple products or branches.
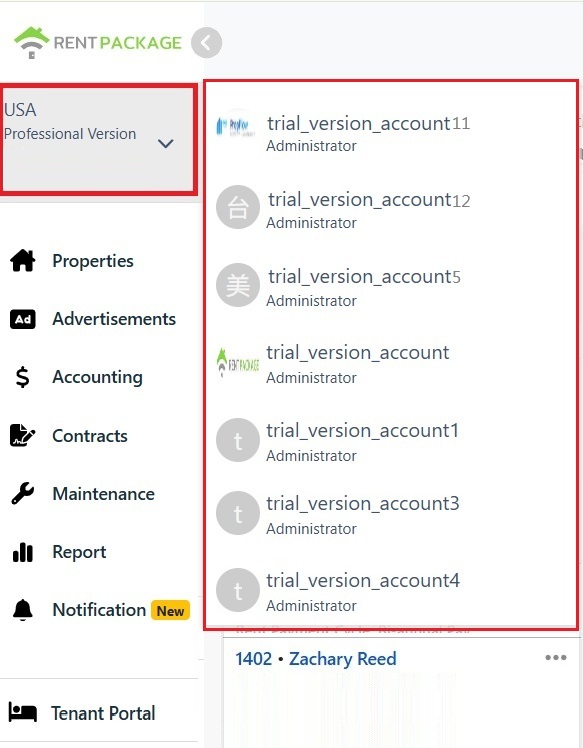
If you've purchased multiple products or manage multiple branches, click the account block at the top left, which shows your current company, version, and role, to expand the account list and switch to another branch with one click. Each branch's properties, transactions, and members are separate, ensuring no data confusion upon switching.
7. Tenant Portal / Owner Portal: Switch to your tenant or owner role
At the bottom of the left menu are the Tenant Portal and Owner Portal. If, besides being a manager, you are also a tenant (you have signed a lease to rent a home) or an owner (you have a property managed on your behalf), the system shows the matching portal. Click it to switch to that role's pages and view your own bills and contracts, without logging out or using another account.
To go back to the management interface, click the account block at the top left and select your company again.
Connect the seven areas: A typical flow
Take the most common daily task, chasing rent, and walk through it once: after logging in, the status bar shows there are overdue bills. Click the Overdue tab and the left panel immediately filters to the units with overdue bills. Click one of them and the workspace loads that unit's Tenant Billing Periods, where overdue bills are marked with the number of overdue days in red. Once you confirm the payment has arrived, Mark as Received on the bill, and the Overdue count in the status bar goes down. Once you understand this path, every other feature follows the same logic: spot the issue in the status bar, locate the item in the left panel, solve it in the workspace.
FAQ
Will my data from multiple branches get mixed up?
No. Each branch operates as a separate account with its own properties, transactions, members, and permissions switched via the account block. Only the selected branch's data is visible after switching.
What are the numbers in the status bar? What happens when I click them?
Numbers provide real-time status stats, like overdue 111 indicating 111 rooms with overdue payments. Clicking a tab filters the left panel list to show rooms of that status; clicking 'All' restores the full list.
Why doesn't my screen exactly match the screenshots?
Menu items vary slightly with the version you purchased and the role you chose when creating the property. For example, a self-managed landlord won't use the Owner Portal. The location of each area and the way it works are the same, and the path in this article applies to every version.
Summary
Without knowing the main screen, next month you will still dig through your ledger to find who is overdue, rely on memory to track which leases are about to expire, and circle through the menus to find a feature every time. Once you know these 7 areas, a glance at the status bar each day is enough: the system has already counted the overdue, expiring and vacant units, and one click takes you to the unit so you can finish everything on the same page.
Log in, click the Overdue tab in the status bar once, then click one of the units to look at its Tenant Billing Periods.
Try RentPackage for freeRelated articles
- RentPackage Add Managed Property: Set up the property, owner, opening balance, and online signing in one go:If your main screen has no properties yet, start here to add your first property.
- RentPackage Tenant Billing Periods: Payment Reconciliation, Partial Payments, Meter Reading, and Deposits. All routine rent collection in one place.:How to use the Tenant Billing Periods that open when you click a unit: Mark as Received, partial payments and meter readings.
- RentPackage Property Overview: Landlords and Property Managers See a Whole Building's Rental Status, Rent and Deposits on One Page:See the rental status, rent and deposits of a whole building on one page with Property Overview.